
Push Back Their Lines
An important campaign is taking place during a war for dominance of a planet. Both forces are trying to push the enemy back to allow the advance of their artillery forces, so that they can assist in breaking the enemy's stronghold. Time is of the essence as crafts in orbit are attempting to bring reinforcements to the planet surface. It is vital to punch a hole through the enemy's defences, so that artillery fire can prevent the reinforcements from being able to land.
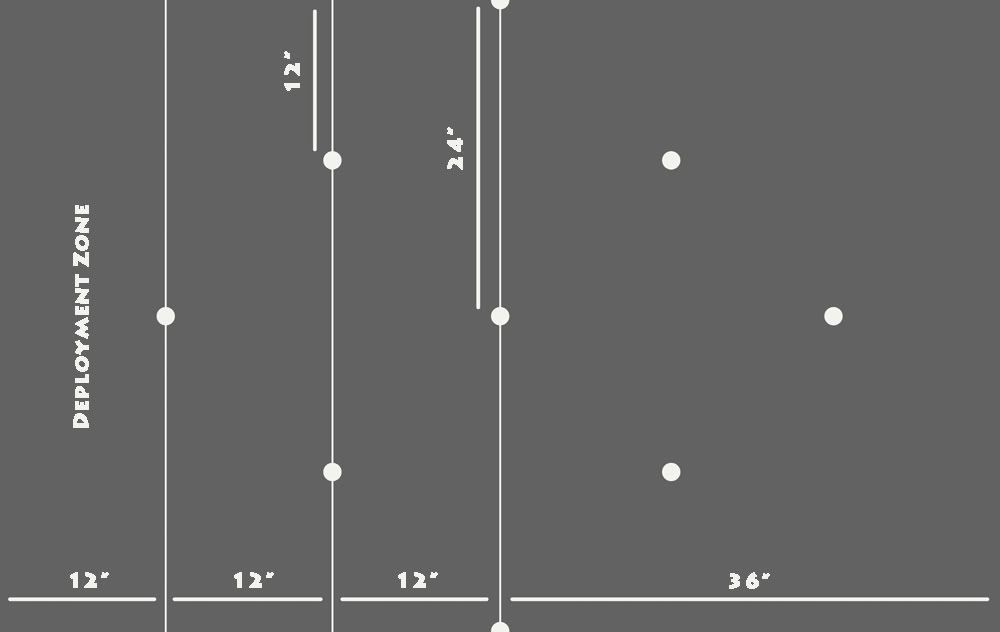
Table Setup
Place 9 control points as demonstrated by the diagram below.
Deployment
Both players roll a D6, the winner gets to choose who deploys first. Each player deploys on opposite short table edges, up to 12 inches onto the table.
First Turn
The player who deployed first takes first turn.
Objective
The 9 control points represent significant battlefield locations. The objective of this mission is to take as many control points as possible to enforce your army's position. It is necessary to push the enemy back so that aggressive maneuvers can be made further across the front.
Control Points
To take possession of a control point, a player must start their turn with any non-vehicle unit (a unit inside of a transport can possess a control point) within 6" of the control point, with no enemy units within 6". Once a unit takes possession of a control point, that control point stays under the control of that player until an enemy unit takes it in return. After possessing a control point at the start of the turn, the unit possessing it may move away from the control point in the movement phase and is not required to stay within 6" of the control point. Players start the game with possession of the control point that is in their sides deployment zone.
Game End/Winning Conditions
The game will end under the following circumstances.
At the end of turn 4
*If either player has possession of all 2 control points on the 2/3 way line (in the opponents table half), the game will immediately end and that player wins the game.
*If both players have possession of all 2 control points on the 2/3 way line (in the opponents table half), the game will immediately end and the game is a draw.
At the end of turn 5
*All circumstance above.
*If either player has possession of all 3 control points on the 1/2 way line, then the game immediately ends and that player wins the game.
At the end of turn 6
*All circumstance above.
*If either player has possession of all 2 control points on the 1/3 way line (in their own table half), the game will immediately end and that player will win.
*If both players have possession of all 2 control points on the 1/3 way line (in their own table half), the game will immediately end and the game is a draw.
At the end of turn 7
*All circumstance above.
*If either player has possession of the control point in their deployment zone, the game will immediately end and that player will win.
*If both players have possession of the control point in their deployment zone, the game will immediately end and the game is a draw.
Warhammer 40K Scenario 2
Disarm the Explosives
Forces have infiltrated an enemy held area responsible for supplying significant resources that are necessary for the success of their current campaign. Reconnaissance has led them to to place explosives to destroy the resource stockpile. The forces responsible for planting the timed explosives are now in withdrawal, attempting to leave the are before its detonation. The opposing force is now in pursuit of the enemy, but their primary objective is to disarm the explosives.
Players
One person plays as the disarming party and the other plays as the withdrawing force. Players may roll a dice to decide who plays which force.
Table Setup
The disarming party may place an objective representing the explosives anywhere in the withdrawing force's table half.
Deployment
Each players deploys on opposite long table edges, up to 12 inches onto the table . The withdrawing force deploy first and may additionally deploy one unit positioned on the objective. The Disarming cannot deploy within 18" of the objective.
First Turn
The disarming forces take the first turn.
Objective - Disarming Party
The disarming party must attempt to disarm the explosive before they detonate. To do this the player must have a non-vehicle unit (infantry in vehicle cannot attempt to disarm) in base contact with the objective. In the shooting phase, instead of shooting, this unit may try to disarm the explosives. To do so the unit must take a LD test at -3 the first attempt, -2 the second attempt and is automatically passed on the third attempt. The explosives may only be attempted to be disarmed once a turn and may only be attempted if the unit is able to shoot. This means that if the unit has run or used fleet, shot a weapon already, is engaged in close combat or any other reason that would prevent it from shooting, it cannot attempt to disarm.
Objective - Withdrawing Force
The force that planted the explosives must now evacuate the area before they detonate. However, the enemy is attempting to disarm the explosive and this must be prevented. To represent the difficulty of the withdrawing forces, they must try to achieve both goals. To complete his/her objective, the person playing the withdrawing force is required to have at least one H.Q choice and two troops choices touching the long table edge that they deployed on when the explosives detonate.
Game End
The game ends when the explosives detonate, everything caught in the blast is killed. Roll at the end of each turn to see if the explosives detonate
Turn 4 --- 6+
Turn 5 --- 5+
Turn 6 --- 3+
Turn 7 --- Auto
Winning Conditions
Explosives Disarmed --- Disarming Forces Win
Explosives Disarmed but H.Q and Troops choices of the withdrawing force have been killed or not touching the table edge --- Draw
Explosives Detonated and H.Q and Troops of the withdrawing force are touching the table edge and are ready to escape --- Withdrawing Force Win
Please feel free to print these scenarios.